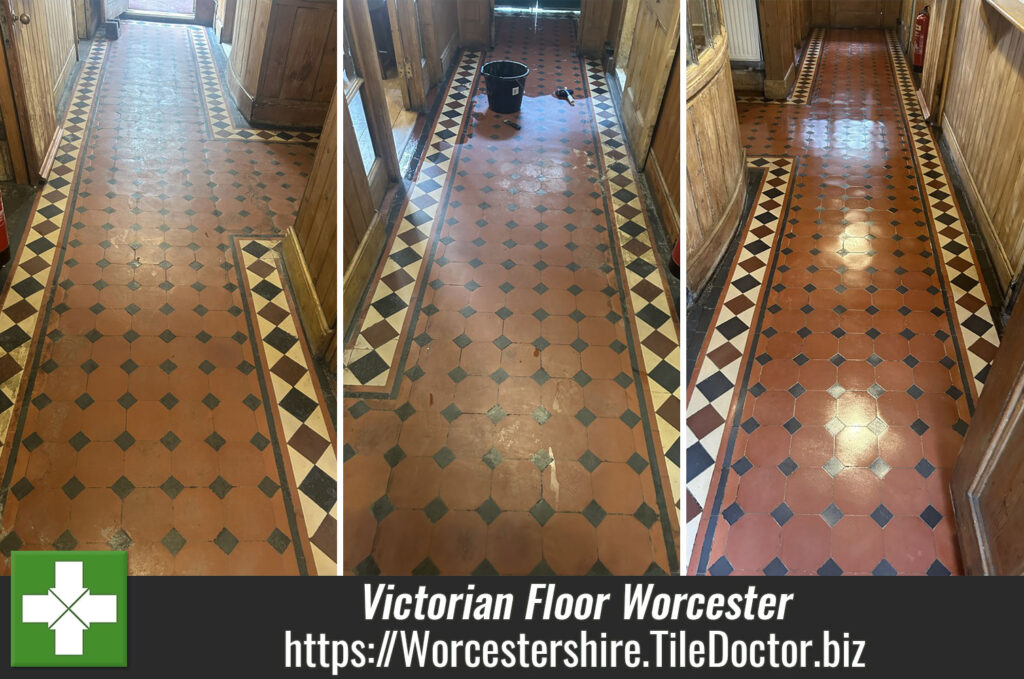
Worcester Tile Cleaning

Worcester Tile Cleaning

Welcome to my Work History archive where you will find examples of the cleaning and renovation of tiles carried out in Worcester.

Black Slate Kitchen Floor Restoration St Johns Worcester

Black Slate Kitchen Floor Renovated in St Johns Worcester

I’m not sure what was previously used to seal these Black Slate floor tiles in the kitchen of a property in the St Johns suburb of Worcester but something had not gone well. The sealer had completely failed and was starting to peel off resulting in a very unsightly appearance.

Slate Kitchen Floor Before Restoration St Johns Worcester

The owner was not happy, as well as the peeling the floor had lost its colour and now looked terrible. I was called in to strip the old sealer off the Slate and replace with something more hard wearing.

I visited the property to survey the floor and investigate the full extent of the problems. After running a few tests, I discussed the process for restoring the Slate. They were happy to go ahead with my quote and we booked in a mutually convenient date for the work to commence.

Removing Sealer from a Slate Tiled Kitchen Floor

To strip off the failed sealer the floor was sprayed with a strong dilution of Tile Doctor Remove and Go with Tile Doctor Oxy-Gel applied on top. Both these products are powerful strippers and Oxy-Gel is also a cleaner. Using a Black scrubbing pad fitted to a rotary floor machine the products were worked into the floor.

This process did a good job of removing the old sealer and cleaning up the tiles and after the pad had been across the whole floor it was rinsed with water and the soiling extracted with a wet vacuum. The process was then repeated until I was satisfied that all the sealer had been removed and the ingrained dirt had been released from the pores of the stone.

Once the floor was clean, I moved my attention to the grout lines, these were flushed and scrubbed with Tile Doctor Pro-Clean worked in by hand with a scrubbing brush. After another rinse and extract the floor was left to dry off overnight.

Slate Kitchen Floor During Restoration St Johns Worcester

Sealing a Slate Tiled Kitchen Floor

The next day I returned to seal the tiles first checking they were dry using a damp meter. All was well so I moved onto applying the sealer which for this Slate floor I had chosen Tile Doctors newest sealing product called X-Tra Seal. This is an oil-based impregnator that works from withing by soaking into the pores of the stone, occupying the pores and thus preventing dirt from residing there.
Several coats of sealer were applied and by the time I had finished the floor was completely transformed. The new sealer had worked wonders on the Slate bringing out the dark colours and character whilst adding durable protection. The floor was now restored and looking how it should.

Slate Kitchen Floor After Restoration St Johns Worcester

For aftercare cleaning I recommended they use of Tile Doctor Neutral Tile Cleaner which will help keep the floor in tip top condition. This is a pH neutral product which is mild enough to be used daily, it will ensure that the newly applied sealer is not compromised unlike some household cleaners which are simply too strong and can break it down.

The floor looked great as you can see from the pictures and the client was very happy with the completed work, another happy Tile Doctor client.


Professional Restoration of a Slate Tiled Kitchen Floor in Worcestershire

Black Slate Kitchen Floor Renovated in St Johns Worcester Read More »

Victorian Tiled Hallway Floor Before After Builders Clean Worcester

Renovating a Paint-Stained Edwardian Tiled Hallway Floor in Worcester

This Edwardian property in Worcester laid in a herringbone tile pattern had been subjected to substantial renovations resulting in a crew of builders treading dirt and building materials through the Victorian tiled hallway. The tiles were now looking very dark and grubby with straining from what cement or plaster. Someone had tried to wash the floor but having realised it wasn’t as easy as it looked reached out to us to have it done professionally.

Victorian Tiled Floor Before Builders Clean Worcester

I decided the best thing to do was to give the tiles a deep clean to remove the old sealers and dirt and then to apply a fresh sealer that would put some life back into the tiles. My quote was accepted and a date agreed for my return and more importantly once all the builders had gone.

Renovating an Edwardian Tiled Hallway Floor

To clean up the tiles, remove the staining and strip off the old sealer I sprayed Tile Doctor’s Remove and Go onto the tile, this product is a multi-purpose stripper formulated with a long dwell-time to remove most sealers, epoxy grout haze, adhesives and even paint.

After leaving it to soak in for ten minutes the Remove and Go had broken down the soiling and was ready to be scrubbed in. I use a Black scrubbing pad to do this fitted to a rotary buffing machine and adding water along the way to help lubricate the process. Once done the soil generated was extracted using a wet vacuum. This process was then repeated until I was satisfied.

Old Victorian floors don’t have a damp proof membrane installed under the floor so the next step was to treat any dormant alkaline salts in the floor using Tile Doctor Acid Gel. These can materialise as white spots on the tiles as the moisture rises through the tile and evaporates on the surface leaving the salt behind. The process is known as efflorescence and you can neutralise the salts by giving the floor an acid wash. The Acid Gel is scrubbed into the tiles as before and then rinsed off with water and then extracted with a wet vacuum.

Once I was done the floor was looking so much better and after more drying with the wet vacuum, I was able to leave it overnight to dry off fully.

Sealing a Victorian Tiled Hallway Floor

Returning three days later, I took some moisture readings with a damp meter first. The readings were fine so satisfied that the tiles were sufficiently dry, I began applying what Tile Doctor Colour Grow. This product was chosen for its ability to improve the colours in the tile and because its fully breathable which is an important consideration when sealing floors that don’t have a damp proof membrane.

Victorian Tiled Floor After Builders Clean Worcester

As you can see from the photos, the floor looks so much fresher and 100% cleaner, not bad for a hundred-year-old floor.

Before leaving I took time to discuss how to look after the floor including the importance of avoiding harsh tile cleaning products on the floor as they can reduce the life of the sealer. For the regular cleaning of sealed Victorian tiles, I recommend Tile Doctor Neutral Cleaner.


Professional Cleaning of an Edwardian Tiled Hallway and in Worcestershire

Renovating a Paint-Stained Edwardian Tiled Hallway Floor in Worcester Read More »

Limestone Tiled Kichen Floor Before and After Renovation Worcester

Grubby Limestone Kitchen Floor Restored in Worcester

This client from Worcester contacted us about their Limestone tiled floor that was installed in their kitchen and utility room. The couple had only recently moved into the property and had wanted something done about the tile and grout which was looking worse for wear and thoroughly neglected by the previous owner.

Neglected Travertine Floor Before Renovation Worcester

I’m based in Worcester, so it wasn’t long before I was able to visit the property and survey the floor and create a quote for renovating it. Hopefully you can see from the photos that the grout had darkened in places and the Limestone tiles looked dull and grubby. The problem with natural stone floors like this is over the years the protective sealer becomes worn down leaving it vulnerable to ingrained dirt. Without a sealer to protect the stone it had become heavily soiled and loses its original polished appearance.

Neglected Travertine Floor Before Renovation Worcester

The quote (which was accepted) included deep cleaning the stone and grout to remove deep seated dirt and then to polish and seal the Limestone to protect it.

Deep Cleaning a Neglected Limestone Tiled Kitchen Floor

To bring the Limestone tile back to life my first step was to run a coarse 400-grit burnishing pad, fitted to a weighted Italian Hypergrinder rotary machine, over the floor using a dilution of Tile Doctor Stone Soap to help with the cleaning and provide lubrication. The 400-grit pad deep cleans the stone and can remove light scratches, old sealers and etching caused by the use of acidic cleaning products such as bleach.

Neglected Travertine Floor During Renovation Worcester

After rinsing the floor with water and then extracting the soil with a wet vacuum I moved onto the 800-grit Burnishing Pad which is the first step in rebuilding the polished appearance on the Limestone. The process is the same as the 400-grit pad and after another rinse and extraction it was repeated using the 1500-grit pad all of which further build on the polished appearance of the stone.

Deep Cleaning Grout on a Limestone Tiled Kitchen Floor

The cleaning and burnishing took up much of the first day however floor pads do struggle to reach into the recesses of the grout lines so before leaving I turned by attention to the grout. For this I made up a strong dilution of Tile Doctor Pro-Clean and applied to the grout lines where it was left to soak in for ten minutes. Then I hand scrubbed the grout using a grout brush. Once done the soil was rinsed off the floor as before and extracted using the wet vacuum. The floor was dried as much as possible using the wet vacuum and then allowed it to dry off fully overnight.

Polishing and Sealing a Limestone Tiled Ground Floor

The following day the final 3000-grit pad in the four-pad set was applied to the floor to bring up the polish even further. The pad is applied dry with only a little water sprayed onto the tile. We call this process a “Spray Burnish” and as well as leaving the floor nice and dry ready for sealing it adds a nice subtle shine to the stone.

To seal the Limestone and further enhance the shine on the Limestone I applied Tile Doctor Shine Powder which is a crystalised powder that is worked into the stone with a White buffing pad running at a slow speed. The crystals add a tough durable deep shine to the stone that provide protection from ingrained dirt.

Neglected Travertine Floor After Renovation Worcester

Once done the floor looked transformed once complete and before leaving, I left a bottle of Tile Doctor Stone Soap with the client and gave them some information about how best to maintain the floor. This product is pH neutral and cleans whilst maintaining the patina on the stone helping to keep the floor in great condition.

Neglected Travertine Floor After Renovation Worcester


Professional Restoration of a Honed Limestone Tiled Ground Floor in North London

Grubby Limestone Kitchen Floor Restored in Worcester Read More »

Marble Floor Before After Polishing Callowend

Polishing Honed Marble Flooring in Callow End near Worcester

The pictures below are of a Polished Marble floor installed at a property in the village of Callow End which is a few miles South of Worcester. The owner of the house had attempted to clean and seal the floor by themselves and as you can see from the photographs, they ended up dulling its appearance. The physical nature of Marble and natural stone floors in general make them a difficult project to attempt without expert knowledge and the right equipment.

Marble Tiled Kitchen Floor Before Polishing Callowend Marble Tiled Floor Before Polishing Callowend

I arranged to survey the floor and explained to the client how I intended to restore the appearance of the Marble to how it should look. I demonstrated the process on a small test area so they could get an idea of the result and explained that the floor could look even better than the day it was installed.

Tile Doctor has developed a system called burnishing for natural stone floors which involve the application of a set of diamond pads which are used in sequence to clean and restore the polish to the stone. My quote was accepted, and a date set for the work to begin which should take two days.

Cleaning and Polishing a Marble Tiled Floor

I arrived on the agreed date and started by sealing up the bases of the kitchen kickboards and skirting with silicone to protect against any damage from water ingress. I then vacuumed the floor to remove any debris and grit.

Tile Doctor Stone Soap was then worked into the floor with the first of a set of diamond encrusted Burnishing Pads. The first pad is a coarse 400-grit pad and is run over each Marble tile four times. The floor is then rinsed with water and the soil extracted with a wet vacuum. This process was then repeated with an 800-grit, 1500-grit and then finally a 3000-grit pad which is applied dry with only a little water spayed onto the floor.

Tile Doctor Stone Soap is a stone cleaning product designed for maintaining the patina on polished stone. Additionally, it has a sealer friendly pH Neutral formula which is ideal for floors like these. Many floor cleaning products you find in supermarkets are too harsh for use on natural stone and can cause damage over time (always read the label).

Sealing a Polished Marble Floor

Once the burnishing was complete the floor needed to be sealed to protect its’ final finish. Tile Doctor have a whole range of sealing products available but for a really durable shiny finish on Marble I recommend the application of Tile Doctor Shine Powder. This is a crystallising powder that provides a very high shine and tough durable finish, it’s worked into the stone using a white pad fitted to a rotary machine.

Marble Tiled Kitchen Floor After Polishing Callowend

My client was absolutely delighted with the result and agreed the floor had never looked so good and lived up to the high standard I told them they could expect.

For aftercare I recommended the use of Tile Doctor Stone Soap which will keep the floor clean and help maintain the deep patina that I had built-up on the Marble tiles.

Marble Tiled Kitchen Floor After Polishing Callowend Marble Tiled Floor After Polishing Callowend


Professional Polishing of a Marble Tiled Floor in Worcestershire

Polishing Honed Marble Flooring in Callow End near Worcester Read More »

Victorian Tiled Church Floor Before After Restoration Worcester

Renovating Flood Damaged Victorian Flooring at a Worcester Church

Earlier this year I was contacted by the church warden of St Clements Church in Worcester regarding the renovation of its Victorian floor tiles. The Church was built 200 years ago and is one of the oldest churches in the city. Unfortunately, being situated close to the West bank of the River Severn it is at risk of flooding and a recent flood had ruined a large section of carpeting which had to be removed. In fact, according to the local newspaper Worcester has been named as sixth worst place in the UK for flooding.

Flood Damaged Church Victorian Tiles Before Restoration Worcester

Every cloud has a silver lining, so they say and, in this case, once the carpet was removed it revealed a very impressive Victorian tiled floor. There were two sections of 24m2 & 10m2, and I visited the Church to survey the floor and assess its condition.

Victorian tiles are generally very robust, and I discovered that the carpet had helped to preserve them in good physical condition. I conducted a few cleaning tests and I could see there were two areas where there was quite a lot of wax, dirt and carpet adhesive that would need removing. I discussed with the warden the process and provided a detailed quote.

Flood Damaged Church Victorian Tiles Before Restoration Worcester

My quote was accepted, and a date agreed to commence the work when their diary was a little quieter as the area would be out of use for a few days.

Renovating a Victorian Tiled Church Floor

On the first day I decided my first task would be to tackle the years of wax build-up and glue around the Altar. To do this I sprayed the floor with a strong dilution of Tile Doctor Remove and Go which is a powerful coatings remover designed for use on Tile and Stone. The tiles were then covered in industrial cling film, this prevents the solution drying out and increases the active dwell time on the tiles so it can really get to work breaking down the wax and adhesive.

Working in sections I repeated the process across the whole floor and after an hour I removed the cling film and then scrubbed the floor with a rotary machine fitted with a 200-grit diamond pad. This really got deep into the tiles and after repeating the process several times the soiled cleaning solution containing the wax and glue was rinsed off the tiles and extracted with a wet vacuum.

I then used handheld burnishing blocks and a scraper on the stubborn and hard to reach places that couldn’t be accessed by the rotary machine. It was a large area that needed to be treated in this way, so the cleaning process took three days before I was satisfied with the result.

Sealing a Victorian Tiled Church Floor

I used a lot of water in the cleaning process, so I left the floor to dry out for a few days, returning the following week to apply a sealer to the tiles.

I sealed the Victorian tiles with Tile Doctor Seal and Go Extra which is which is breathable thereby allowing for moisture to rise through the tiles and evaporate. This is an important consideration for old tiled floors where a damp-proof membrane hasn’t been installed. Without this moisture can build up in the floor where it could eventually spread out to the walls resulting in rising damp. The tiles took five coats of sealer and each coat had to be left to dry before applying the next so naturally this took some time and had to be done in sections cordoned off from the parishioners. Once the sealer had been applied to the whole floor the transformation of the church floor was complete, the floor looked fantastic and much more in-keeping with the period look of the building.

Flood Damaged Church Victorian Tiles After Restoration Worcester

I received a glowing review from the Church which I have copied below. I also heard that a parishioner had seen the floor and had cried because the last time she had seen the floor was 50 years ago at her wedding, its moments like those that make my job very worthwhile!

Mark Conway was an absolute star. He worked so hard on our Church floor. It looks magnificent now and everyone has commented on how beautiful it looks. Mark was such a nice friendly and helpful person and went the extra mile. Thanks Mark. A brilliant job.

Flood Damaged Church Victorian Tiles After Restoration Worcester


Professional Restoration of a Victorian Tiled Church Floor in Worcestershire

Renovating Flood Damaged Victorian Flooring at a Worcester Church Read More »

Dirty Ceramic Tile Grout Before After Grout Colouring Worcester

Light Grey Grout Recolouring on a Ceramic Tiled Kitchen Floor in Worcester

If you don’t like the colour of your grout or it’s severely stained, we usually recommend Grout Colouring which can be done with a kit from Tile Doctor and is available in ten popular colours. This was the case with a client of mine who wanted her Ceramic tiled Kitchen floor renovated.

Patchy Grout Before Recolouring in Worcester Kitchen

I visited the property in Worcester to survey the floor and discuss it with the owner. My client was mainly unhappy with the dark patchy floor grout and wanted the tiles cleaned and the grout deep cleaned to bring back the original lighter colour. We have multiple products for cleaning grout available but in this case the staining was so deep I recommended Grout Colouring. I usually keep a range of colours in my vehicle so I was able to demonstrate how it would look on an inconspicuous part of the floor and light grey was chosen.

Patchy Grout Before Recolouring in Worcester Kitchen

Grout Recolouring of a Ceramic Tiled Kitchen Floor

I returned on the agreed date to renovate the floor and started by applying protective sheets to the kitchen units. Next I cleaned the floor with a green pad fitted to a rotary scrubbing machine. I used Tile Doctor Pro-Clean to cut through the grime and this soon darkened with the dirt that was released from the tile and grout. The soiled cleaning solution was then rinsed with water and extracted using a wet and dry vacuum, keeping the mess to a minimum.

The next step was to ready the grout joints for the recolouring process, this is done by spraying Tile Doctor Grout Colourant Pre-Treat Cleaner into the joints, leaving it to dwell for a few minutes and then scrubbing it in by. As well as cleaning, the solution etches the grout which ensures a strong bond with the grout colourant.

The floor was then speed dried with blowers and a heat gun. The grout was then given two coats of the Tile Doctor Light Grey Grout Colourant. This product is painted onto the grout line using a small brush, it takes a little time to complete and any residue is removed with a baby wipe before it has time to dry. Although tedious to apply the result is worth waiting for and it left the floor looking so much lighter and fresher.

Patchy Grout Before Recolouring in Worcester Kitchen

The client was extremely happy and left a glowing review

“Mark proved to be a good choice for the three different floors that we needed to renovate. He explained clearly what he could do for each of them, carried out the work efficiently, and produced a finished job of a high standard. Mark is a good worker who is also easy to have around the house which is always an important aspect in the middle of major work being done. Adrian G, Worcester “

The grout colourant adds a tough barrier over the grout so it will keep its looks for a very long time, it also makes it much easier to clean. For aftercare I recommended the use of Tile Doctor Neutral Tile Cleaner which is a pH neutral product designed for the maintenance cleaning of tile and grout.

Patchy Grout Before Recolouring in Worcester Kitchen


Professional Recolouring of grout on a Ceramic Tiled Kitchen in Worcestershire

Light Grey Grout Recolouring on a Ceramic Tiled Kitchen Floor in Worcester Read More »

Edwardian Tiled Hallway Floor Renovated in Worcester

Renovating an Edwardian Tiled Hallway in Worcester

This customer bought an Edwardian property in Worcester and discovered a stained yet beautiful tiled period floor when removing the hallway carpet. They were delighted to find the tiles were in good physical condition but as you would expect the floor needed a thorough clean and then sealing to protect the tiles and improve the finish.

Edwardian Hallway Tiled Floor Before Clean and Seal

The property was well located, close to the city centre, River Severn and the stunning historic 12th century Worcester Cathedral. Neighbouring houses were of a similar age and it was lovely to see so many of them had retained their Edwardian tiled porchways. Naturally the new owners were keen to retain as many of the period features of the property as possible, and so over the moon to discover the original hallway.

Edwardian Hallway Tiled Floor Before Clean and Seal Edwardian Hallway Tiled Floor Before Clean and Seal

After popping round to survey the floor I discussed my plan for restoring the hallway and submitted a quote based on two days’ work. The quote was accepted, and the work was scheduled for later in the month.

Cleaning an Edwardian Tiled Hallway Floor

The first day was spent cleaning the floor, firstly removing the carpet glue which was quite heavy on the edges of the floor. I used Tile Doctor Remove and Go for this and ceramic hob scraper, sometimes the oddest tools are the best! I then sprayed more Tile Doctor Remove and Go on to the remaining tiles leaving it to dwell for ten minutes. Then working the solution into the tiles with a 200-grit diamond pad fitted to my rotary scrubber, I really started to make some progress.

The soil generated was extracted with a wet vacuum and I made a start on giving the floor an acid wash. For this I applied Tile Doctor Acid Gel and pasted it onto the floor again working the gel into the tiles. Tile Doctor Acid Gel is particularly useful for removing cement and grout smears. Also, there was some evidence of salt stains (Efflorescence), old floors like these don’t have a damp-proof membrane so it’s quite normal for moisture to rise through the tile.

I removed the slurry with a heavy duty wet and dry vacuum cleaner. Then as a final measure I used micro fibre cloths and some Tile Doctor Grout Clean-up to remove any remaining smears once the floor was clean. I left for the day allowing the floor to dry overnight and would return the following day to seal.

Sealing a Edwardian Tiled Hallway Floor

Returning the following morning, I first checked the floor with a moisture meter to ensure it had dried off fully overnight. The sealer I would use as agreed with the customer would be Tile Doctor Seal and Go Extra. This is a topical fully breathable semi-gloss sealer and would give a nice light sheen and allow the colours in the tile to shine through. This sealer is fully breathable and would cope well with the light efflorescence issues the floor had experienced in the past.

Edwardian Hallway Tiled Floor After Clean and Seal Edwardian Hallway Tiled Floor After Clean and Seal

The moisture readings were fine, so I started to apply the first coat of sealer using micro fibre cloths. After allowing the required drying time between coats I started on the second coat. Leaving the right amount of time between coats is especially important in winter when drying takes longer. The floor was treated to five coats of sealer in total and the customer was very satisfied with the finish.

Edwardian Hallway Tiled Floor After Clean and Seal


Professional Restoration of a Edwardian Tiled Hallway in Worcestershire

Renovating an Edwardian Tiled Hallway in Worcester Read More »

Craven Dunnill Victorian Floor Tiles Before After Renovation Worcester

Craven Dunnill Victorian Floor Tile Clean and Repair Worcester

I received an enquiry for a clean and seal on this Victorian tiled floor in Worcester, so having spoken to the customer on the phone I arranged a time to make on-site visit to survey the floor and get a good look at the requirements, so I could advise on the cost.

On inspection I could see that not only was the floor pretty dirty, there was also an area of missing tiles. I managed to trace the tiles to Craven Dunnill a high-quality Victorian floor manufacturer based in nearby Bridgnorth that have been in business since 1872. Thankfully I knew I was able to source some more for them which would match nicely. The owner of the property was delighted to hear that not only would we clean the floor, but we could also source, supply and fit replacement tiles thus making the floor complete again.

Victorian Floor Before Restoration Worcester

After visiting the property, I sent the customer an accurate quote for the repairs and to clean and seal the hallway floor. They were happy with the price and my quote was accepted and a date arranged to complete the work.

Cleaning/Repairing a Victorian Tiled Hallway Floor

On arrival the first step was to set up my equipment including a rotary floor scrubber/polisher, a wet and dry vacuum and my tile cutter.

I started with the floor edges first as they are difficult for floor machines to get into effectively. The process involved spraying the edges with Tile Doctor Remove and Go and then scrubbing it in with a a handheld diamond burnishing block. I then sprayed the rest of the floor with more Remove and Go and left it to dwell for ten minutes. I then proceeded to work the product into the floor with the rotary machine fitted with a black scrubbing pad.

Victorian Tiled Hallway Floor During Cleaning Worcester

The floor was then rinsed with water and the soil extracted using a wet vacuum. My next step was to give the tiles an acid wash by scrubbing Tile Doctor Acid Gel into the floor effectively repeating the previous process. The Tile Doctor Acid Gel is especially effective on Victorian floor tiles to remove mineral salt deposits (efflorescence) and old grout smears. Once I was done the soil was rinsed off as before and extracted with a wet vacuum.

Once I was happy the floor was clean, I moved onto the repairs, carefully measuring and cutting the shapes and fixing the tiles into the gaps with rapid set adhesive. I then grouted the area and left the tiles and floor to dry for the rest of the day and would return the following day to seal.

Victorian Tiled Hallway Floor During Repair Worcester

Sealing a Victorian Tiled Hallway Floor

I returned the next day and after checking the floor was dry with a moisture meter, I started with sealing. The product I used was Tile Doctor Seal and Go Extra, this is a fully breathable sealer with a semi-gloss finish which is ideal for old floors like these that won’t have a damp proof membrane installed. I worked the product into the floor leaving 30 minutes between coats and treated the floor to four coats before I was happy the floor was completely sealed.

Victorian Floor After Restoration Worcester

The customer was very happy with the finished floor and left some great feedback (see below) and has been asked by family and neighbours for our details.

“Very pleased with the result. Mark arrived on time every day and was sure to tidy away after himself, leaving no mess. Our Victorian tiled hallway now has a new lease of life and people are already asking who did it? I would have no hesitation in Recommending Mark.”

Victorian Floor After Restoration Worcester


Professional Restoration of a Victorian Tiled Hallway in Worcestershire

Craven Dunnill Victorian Floor Tile Clean and Repair Worcester Read More »

Quarry Tiles Refurbishment Worcestershire Farm

Restoring Quarry and Flagstone Tiles at a Worcester Farmhouse

This restoration of two different types of tiled floor took place in the kitchen of a farm property in Worcester which had been in same family for generations. The floor was made up of Quarry tiles, some of which were damaged and Flagstones both of which were in true need of a deep clean and seal.

Cleaning Quarry and Flagstone Tiles

Before I could start cleaning the Quarry floor, we needed to carefully remove and any broken tiles and install suitable replacements including a large damaged flagstone.

Quarry Tiles Refurbishment Worcestershire Farm Flagstones Replacement Worcestershire Farm

I wanted everything to match as closely as possible so I also opted to grind out the old grout and replace with fresh grout in a light grey.

The whole area was then deep cleaned with a black scrubbing pad and Tile Doctor Pro-Clean to remove ingrained dirt, the soiled cleaning solution removed with a wet vacuum and then the floor was treated to an acid wash with Tile Doctor Acid Gel. Acid Gel is a blend of phosphoric and hydrochloric acids in gel form which can remove grout smears and efflorescence from salts on the tiles.

Sealing Quarry and Flagstone Tiles

After leaving the floor to dry completely overnight, I returned to the property to seal both sets of tiles with three coats of Tile Doctor Seal and Go Extra. This sealer is very breathable allowing moisture vapour to rise up through the tile and ideal for situations where no damp proof membrane has been installed which is especially relevant in older properties such as this one.

Quarry Tiles Refurbishment Worcestershire Farm Flagstones Replacement Worcestershire Farm

The customer was very pleased with the results. The positive influence of a deep clean and seal on both the Quarry and Flagstone tiles is very clear in the photos. Another satisfied customer.

Professional Quarry and Flagstone Farmhouse Floor Renovation in Worcestershire

Restoring Quarry and Flagstone Tiles at a Worcester Farmhouse Read More »

Quarry Tiled Hallway Worcester Before and After Cleaning

Old, Salt Damaged Quarry Tiled Ffloors Restored in Worcester

Here’s an interesting job I recently completed for a client in the historic city of Worcester. My client had two tiled floors in her house that were in dire need of restoration. They were located in the hallway and dining room of the house, and were a mix of Quarry tiles, with some believed to be over a century old. The entire area required a thorough clean and seal, while some of the tiles were showing evidence of salt damage in the grout lines, this is usually caused by damp evaporating up through the tile and grout and is more commonly known as efflorescence.

Quarry Tiled Hallway Worcester Before Cleaning Quarry Tiled Hallway Worcester Before Cleaning

Cleaning Quarry tiled floors

I completed the cleaning and sealing processes over the course of two days. My first task was to break down any old sealer and hard wax coatings left on the surfaces of the floors from previous maintenance. Working in two metre square sections I scrubbed Tile Doctor Remove & Go into the floor, Remove and Go is a coatings remover (aka stripper) that is safe to use on Tile, Stone and Grout and is great for tackling old sealers and waxes, the product can also used to remove glue and other adhesives. This was then rinsed off and the resulting slurry extracted using a wet vacuum; the process was then repeated as necessary until all the sealers etc. had been removed.

Following the removal of the old coatings I diluted Tile Doctor Pro-Clean with four parts water and I worked the solution into the floor using a black scrubbing pad to lift out any ingrained dirt from the tile. Pro-Clean is a high alkaline cleaner which is highly effective and again safe to use on Tile, Stone and Grout.

To complete the cleaning process I addressed my attention to the salt that was evidence in the grout between some of the tiles. I used Tile Doctor Grout Clean-Up for this, which removes salt and other mineral deposits, along with any stains, dirt and grout haze.

Sealing Quarry Tiled Floors

After completing the clean I gave the whole floor a thorough rinse which was then removed using a wet-vac machine, before leaving the whole area to dry overnight. I installed two air movers and a dehumidifier to speed up the process, and by the time I returned to the house the next day, the tiles were ready to be sealed.

To seal the floor I used four coats of the new Tile Doctor Seal & Go Extra, which is especially recommended for sealing external tiles or internal tiles with a damp problem. The product formula has increased breathability as well as providing a robust surface seal along with an aesthetically pleasing, low-sheen finish.

Quarry Tiled Hallway Worcester After Cleaning Quarry Tiled Hallway Worcester After Cleaning


Quarry Tiled Hallway and Dining room Stripped, Cleaned and Sealed in Worcestershire

Old, Salt Damaged Quarry Tiled Ffloors Restored in Worcester Read More »

Limestone and Slate tiled floor Before and After Restoration in Worcester

Limestone and Slate tiled hallway restored in Worcester

I recently had a chance to complete a job at a house down in the bustling city of Worcester, home to one of the UK’s fastest growing universities, the University of Worcester, along with the much-loved condiment, Worcestershire sauce.

Limestone and Slate tiled floor before Restoration in Worcester
I was asked by my client to restore an interesting hallway floor that was made up of Limestone and Slate tiles laid in a diamond pattern. Both Limestone and Slate are reputed for their durability, and are popularly used for both interior and exterior flooring. However, this particular floor, situated in a high-traffic area of the house, was covered with many layers of dirt built up over the course of several years, and was marked by a number of loose tiles.

Limestone and Slate tiled floor before Restoration in Worcester

Cleaning and replacing Limestone and Slate tiles

My first job in the process of restoring the hallway was to give it a deep clean. I mixed up a solution of Tile Doctor Pro Clean and clean water, before scrubbing it into the tiles. I use Pro-Clean to clean most natural stone floors as it works very well to lift out ingrained dirt and stains.

Limestone and Slate tiled floor before Restoration in Worcester
Nonetheless, as the floor had suffered from more than its fair share of dirt over the years, I opted to also use Tile Doctor Remove & Go stripper which, in addition to removing any old sealer from the surface of the tiles, contains cleaning properties to ensure any remaining muck is eradicated.

Limestone and Slate tiled floor During Tile Replacement Restoration in Worcester
After completing the clean, I set about refitting the loose tiles, and in one particular area I had to remove and re-build the base back up. In order to effectively reuse the tiles, I had to grind off all the old adhesive.

Limestone and Slate tiled floor rebuilding base Restoration in Worcester

Sealing Limestone and Slate tiles

After leaving my work to set and dry for a period of a few days, I returned to put the finishing touches on the job with by sealing the hallway floor. I made sure that the surface was completely dry before commencing the seal, as any excess moisture might have affected the performance of the sealer, Tile Doctor Seal & Go.

This product is used to provide internal, porous surfaces with a stain resistant surface seal and, as you can see from the photos, a nice low-sheen finish. The low-sheen finish really helps to bring out the distinct colours in the Limestone and Slate tiles.

Limestone and Slate tiled floor after Restoration in Worcester
My client was amazed at how quickly I was able to rejuvenate the appearance of her hallway floor, especially considering the many years’ worth of dirt there was to tackle, as well as some tricky loose tiles.

Slate Hallway given new life in Worcestershire

Limestone and Slate tiled hallway restored in Worcester Read More »

=================================

Worcestershire Tile Doctor

================================= Read More »

Scroll to Top